"Success is following the pattern of life one enjoys most." Al Capp
In March, 2014, I published an e-book, Step Out in Style, with 40 new tangle patterns - mostly my own, but also with contributions from other CZTs. The book has been very well received, and I'd like to thank those of you who have purchased it. I called it Volume 1, leaving the door open for me to possibly do a Volume 2. For the last year and a half I have thought about it, and finally came to the decision that I will NOT be creating another volume. However, I do enjoy coming up with new patterns, or at least what I think are new patterns, as there are SO many out there that I can never be sure.
So... from time to time I'll be blogging about a pattern for which I've created the step-outs. Today is the first one. This pattern begins like Beeline, a pattern from Rick Roberts and Maria Thomas, founders of the Zentangle Method. But in the end, it looks totally different. I love patterns with lots of repetitive lines, and if you are a fan of those patterns also, I think you'll enjoy this one. Of course I'm hoping that you all like it, even if you're not crazy about lines like I am.
I've decided to call it Zigbee. Zig for the zig zag lines, and bee for the fact that it begins like Beeline. Here are my step-outs.
First, a couple of notes about the pattern:
- In step #3, after you have drawn your first column of diamonds, move over to leave some space, and aura the the right side of your diamond. Do NOT draw your next column of diamonds right next to the first one. Remember to do that after each column of diamonds.
- In step #7 I show one way to shade Zigbee, but you may find your own way of shading that you like better. Sometimes shading can totally change the look of a tangle.
- In step #8 I show a tangleation (variation) of Zigbee. Notice that I have drawn the lines in the spaces surrounding the diamonds in different directions. This brings out the star shapes in the pattern, which I have heavily shaded here to make it easy for you to see.
I'm sharing several tiles I created as I was playing with the pattern, showing some of the different results you get based on shading, filling, and changing line direction. These are not in the order I drew them, but I do have my reasons for showing them this way.
Here's one on a zendala that I colored using Ranger distress ink pads. In case you're interested, my colored tiles are for sale in my Etsy shop. This is the unshaded tile, showing two variations of Zigbee that look a bit different because I chose to blacken different areas.
This is what it looks like after being shaded.
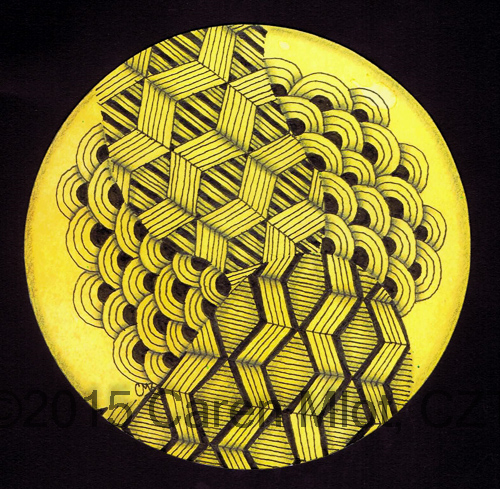
The next one shows how to make star shapes really pop out by drawing the lines as shown in my tangleation in the step-outs, as well as creating black stripes in the stars. Notice that on the left side of the tile I used all straight lines, and on the right side I curved the lines to make it puffy looking.
In the tile below, I again drew the lines as in my tangleation, but this time just used shading to make the stars (partial stars) pop a little. This is one where your eyes can really play tricks on you. Focus on the tile one way and you will see the stars pop, but keep looking and your focus may change so that you see cubes popping out instead.
I did one more on a Renaissance (tan) tile. Here I used both black and brown Micron pens, graphite and brown pastel pencil for shading, and white pastel pencil for highlights.
And there you have it - Zigbee! I hope you enjoy the pattern. Have fun playing, and I'd love to see what you create with it.
"Variety of mere nothings gives more pleasure than uniformity of something." Jean Paul
One of my favorite tangles is 'Nzeppel, so I was happy to see that it's the focus tangle this week on the Facebook group Square One. Right off the bat I knew I'd be creating multiple tiles for this "One." When I taught a class a few months ago all about tangleations, 'Nzeppel was one of the tangles I showcased. I had worked on several tangleations and decided to use some of them in my tiles for this focus. In case you don't already know, a tangleation is a noticeable variation of a tangle pattern. I will be showing you my tiles, as well as the step-outs for the tangleations I used.
If you aren't familiar with the tangle pattern 'Nzeppel, you can see the step-outs here. For my first tile I chose to use the random variety of the pattern, not based on a grid. This is not one of my tangleations, but one of the ways to draw 'Nzeppel introduced by Maria Thomas and Rick Roberts. First I drew Cosmo, by CZT Sonya Yencer, as my string and filled all the background with random 'Nzeppel. I didn't take a picture before shading, but believe me, the shading made such a huge difference in this tile! I only wish I could get the shading in my scanned photos to look like it does in real life!
Here is my second tile, using one of my tangleations, along with my pattern Sharmin, from my e-book Step Out in Style.
Below are the step-outs for this tangleation. Notice that the first 2 steps are what you would do for the standard form of 'Nzeppel, which I think of as squishing balloons into the triangular spaces. But then I drew auras inside each of those squished balloons. An aura is a line traced around the outside or inside of a tangle. In the last box I demonstrate two different ways this can be shaded, and used the one on the right side to shade the above tile.
Next I decided to try out the pattern Onion Drops by Shasta Garcia, which I've never used before. I added another tangleation of 'Nzeppel in the background.
Here are the step-outs I used for the tangleation shown above. After drawing my grid and an X in each square of the grid, I drew lines dividing each of the triangles into two sections, as shown. Then I added a squished balloon in each section.
For my last tile, I used a third tangleation. I created a very large 'Nzeppel in the center of the tile, surrounded by a little Tipple and a lot of Hollibaugh.
The step-outs for that tangleation are shown below. Instead of drawing an X in each square of the grid, I only drew one diagonal line, alternating the direction of the diagonal in each square. Then I added a line in each of the triangles to divide it into two sections, and squished my balloons into each one of those sections.
'Nzeppel is a pattern that you can really do a lot with. Other ideas that I've used are a really curvy grid, an offset grid, and one more that I did the step-outs for, but do not have a tile to show you.
In this one, I again started with an X in each square. Then I drew another triangle inside each triangular section (an aura), and squished a balloon into each of those triangles.
'Nzeppel isn't the only pattern you can create so many tangleations for. Try it yourself with another pattern and you might be surprised by what great variations you end up with. A wonderful way to make a pattern your own!